
Garlic Mayonnaise From Scratch
Here is an easy one from my sister in law.
We ran out of mayo so she whipped up a batch in the food processor.
1 egg
1/2 Teaspoon Garlic
1/2 Teaspoon Mustard
1 Tablespoon of Lemon Juice
3/4 cup of vegetable oil
salt and pepper
In a food processor add everything but oil
Mix in pulses til well blended
Slowly pour oil into food processor while pulsing
Pulse til thickened
Chill then use
Super Tasty and easy to make larger batches.
Hope you enjoy
FruitStripeApe
Sunday, December 26, 2010
Thursday, December 23, 2010
Baked Flank Steak
Baked Flank Steak
2lbs Flank Steak
Salt + Pepper
Dry Garlic and Herb mix
Spray oil
Pre Heat Oven to 400F
Sear flank steak in a oiled pan
Once seared put in the oven for 20 Minutes
Take out and Rest for 10 minutes
Thin slice against the grain and top with meat dripping
I served mine with Sweet Potato Fries, Peas (Organic) and a Salad (Organic).
Hope you Enjoy,
FruitStripeApe
Tuesday, December 21, 2010
Blanched Mini Pepper and Tomato Sauce with Pork Meatballs and Portabella Mushrooms
I made this awesome sauce last night and thought i would share it with you. :^)
Pepper and Tomato Sauce with Pork Meatballs and Portabella Mushrooms
2lbs ground pork (formed into 1" balls)
2lbs mini peppers (boiled for 5 minutes)
4 Large Tomatoes (boiled 5 minutes or until skin bursts)
6 Large Portabella Caps (cut into strips)
Spray oil (for spraying down all the pans)
Salt + Pepper
Herb De Providence
Italian Herb Mix
Heat a pan to medium high
Brown Pork Balls
Once browned let sit on paper towels
Season with Herb De Providence and salt + pepper
Take boiled peppers and pull the tops off
Then De-seed and rip in half
Take boiled tomatoes and de-skin
Put both in a oiled pot and turn heat on to medium
Cook for 10 mintues
Use an stick blender or food processor
Blend unto smooth
Season with salt + pepper and Italian Herb Mix
Throw Pork Meat Balls into the sauce and simmer for 20 Min.
Saute mushrooms until tender but not mushy.
Serve all on Linguine and bread (for meat ball sandwiches on the side hehe)
Serves 5+ people, we had 5 people eat it with lots of sauce, 6 meatballs and some noodles leftover.
Hope You Enjoy!!
FruitStripeApe
Sunday, December 19, 2010
Dry Stacking Building Technique with block and info
Dry Stacking Building Technique with block and info
I had severe water damage to my house a few years ago and had to replace a whole basement wall so we dry stacked it and made it solid and water proof. It is a lot easier than standard masonry work so you can do it all yourself.
Here is Quikrete's Guide
QUIKWALL® Surface Bonding Cement (SBC) now makes most block
construction possible without using mortar; it's literally a "stack and
stucco" project. A single coat on dry-stacked block gives a handsome
stucco finish and provides greater flexural and impact strength than
mortar with less expense. A 50 pound bag will cover approximately 50
square feet at a 1/8" thickness. In planning your project, note that
actual rather than normal block size is used since joints are not
buttered.
Block Walls
The same basic techniques of wall construction are used no matter
what your project happens to be.
• QUIKRETE® Surface Bonding Cement
• QUIKRETE® Concrete Acrylic Fortifier
• QUIKRETE® Sand Mix or QUIKRETE® All-Purpose Sand (if needed)
• QUIKRETE® Concrete Repair Caulk
• Mason's line
• Level concrete or joint trowels
• Chalk line
• Mason's hammer
• Brick set
• Straight-edge
• Metal tie bars
• Metal lathe strips
Construction
1. Construct the footer for the wall.
2. To ensure square, accurate corners and straight walls, dry-lay the
corner leads and first course and chalk mark the block positions on
the footer. Use a level and mason's line for accuracy.
3. Remove the blocks and lay 1/8" bed of prepared QUIKWALL®
SBC on the footer. This bed of QUIKWALL® SBC helps in leveling
the first course if there are slight irregularities in the slab of footer.
Relay the bottom course checking alignment and level every 3 to 4
blocks.
4. For projects with wall openings or intersecting walls (other than at
corners), refer to steps 6 and 7. Otherwise, dry-stack the remaining
block in a running bind pattern to the desired height. If necessary,
shim with QUIKRETE® All-Purpose Sand or Sand Mix.
5. Wet down the wall and apply 1/8" QUIKWALL® SBC coat to both
the sides and exposed ends of wall using a finishing trowel with an
upward motion. If you must stop work, stop the QUIKWALL® SBC
application on a block, not a joint between blocks.
6. Stack and bond the main and bearing wall intersection together in
4- to 6- course intervals. After the main wall has been stacked and
coated no higher that 6 courses , begin constructing the intersecting
wall. It too should be placed and leveled in an 1/8" to 3/8" bed of
QUIKWALL® SBC. Embed metal ties every 4 to 6 courses as shown.
Stuffing the bottom of the block cell opening with paper will allow you
to fill it with paper will allow you to fill it with mortar to hold the tie.
Continue to build the intersection in intervals to the full height of the
wall.
7. To construct window or door openings, dry-stack the block no more
than 2 or 3 courses higher that the bottom of the opening before
framing out the opening to exact dimensions. The wall is then built up
around the frame. Precast lintels make finishing the top of doors and
windows easy. Because precast lintels are nonporous, the
QUIKWALL® Surface Bonding Cement applied over the lintel must be
fortified with QUIKRETE® Concrete Acrylic Fortifier. Simply lay the
lintel in place and coat it with fortified QUIKWALL® SBC mix.
8. Vertical control joints are needed to handle stresses and prevent
cracking of the block or QUIKWALL® SBC finish. Spacing between
control joints is determined by wall height. In general the ratio of
control joint spacing to wall height is about 2:1. That is a 2' high wall
should have control joints every 4', a 4' wall every 8', and an 8' wall
every 16' to 20'.
Control joints are also needed at the following points of weakness
and/or high stress concentration.
• At all abrupt changes in wall height
• At all changes in wall thickness, such as those at pipe or duct
columns or pilaster
• Above joints in foundations and floors
• Below joints in roots and floors that bear on the wall
• At a distance of not over half the allowable joint spacing from
bonded intersections or corners
• At one or both sides of all door and window openings unless
other crack control measures are used, i.e., joint
reinforcement or bond beams
Regardless of the control joint design used, rake out the wall joint and
caulk with QUIKRETE® Concrete Repair Caulk.
9. Attach capping sills to the top course by anchoring bolts firmly into
the concrete or QUIKWALL® SBC. Moist-cure the wall after 8 hours
by dampening with a fine spray. Repeat several times daily for 3
days. Roof or floor construction can proceed when the curing is
complete.
For Best Results
• Take extra care that the bottom course is laid properly,
because each succeeding course will simply be stacked on it.
• To ensure proper bonding, make certain that the blocks are
clean and free of any dirt, soil, or grease.
• Before laying the block, remove any burrs and chips from it
with a hammer to get a tight fit. Mix only as much
QUIKWALL® SBC as can be used in 1 hour.
• To obtain the finish you desire, experiment with different
trowels and techniques before applying the QUIKWALL®
SBC coat to your wall.
Here is from thenaturalhome.com
Dry stack concrete block walls use surface bonding cement (SBC)


Hope this is Help Full. FruitStripeApe
I had severe water damage to my house a few years ago and had to replace a whole basement wall so we dry stacked it and made it solid and water proof. It is a lot easier than standard masonry work so you can do it all yourself.
Here is Quikrete's Guide
QUIKWALL® Surface Bonding Cement (SBC) now makes most block
construction possible without using mortar; it's literally a "stack and
stucco" project. A single coat on dry-stacked block gives a handsome
stucco finish and provides greater flexural and impact strength than
mortar with less expense. A 50 pound bag will cover approximately 50
square feet at a 1/8" thickness. In planning your project, note that
actual rather than normal block size is used since joints are not
buttered.
Block Walls
The same basic techniques of wall construction are used no matter
what your project happens to be.
• QUIKRETE® Surface Bonding Cement
• QUIKRETE® Concrete Acrylic Fortifier
• QUIKRETE® Sand Mix or QUIKRETE® All-Purpose Sand (if needed)
• QUIKRETE® Concrete Repair Caulk
• Mason's line
• Level concrete or joint trowels
• Chalk line
• Mason's hammer
• Brick set
• Straight-edge
• Metal tie bars
• Metal lathe strips
Construction
1. Construct the footer for the wall.
2. To ensure square, accurate corners and straight walls, dry-lay the
corner leads and first course and chalk mark the block positions on
the footer. Use a level and mason's line for accuracy.
3. Remove the blocks and lay 1/8" bed of prepared QUIKWALL®
SBC on the footer. This bed of QUIKWALL® SBC helps in leveling
the first course if there are slight irregularities in the slab of footer.
Relay the bottom course checking alignment and level every 3 to 4
blocks.
4. For projects with wall openings or intersecting walls (other than at
corners), refer to steps 6 and 7. Otherwise, dry-stack the remaining
block in a running bind pattern to the desired height. If necessary,
shim with QUIKRETE® All-Purpose Sand or Sand Mix.
5. Wet down the wall and apply 1/8" QUIKWALL® SBC coat to both
the sides and exposed ends of wall using a finishing trowel with an
upward motion. If you must stop work, stop the QUIKWALL® SBC
application on a block, not a joint between blocks.
6. Stack and bond the main and bearing wall intersection together in
4- to 6- course intervals. After the main wall has been stacked and
coated no higher that 6 courses , begin constructing the intersecting
wall. It too should be placed and leveled in an 1/8" to 3/8" bed of
QUIKWALL® SBC. Embed metal ties every 4 to 6 courses as shown.
Stuffing the bottom of the block cell opening with paper will allow you
to fill it with paper will allow you to fill it with mortar to hold the tie.
Continue to build the intersection in intervals to the full height of the
wall.
7. To construct window or door openings, dry-stack the block no more
than 2 or 3 courses higher that the bottom of the opening before
framing out the opening to exact dimensions. The wall is then built up
around the frame. Precast lintels make finishing the top of doors and
windows easy. Because precast lintels are nonporous, the
QUIKWALL® Surface Bonding Cement applied over the lintel must be
fortified with QUIKRETE® Concrete Acrylic Fortifier. Simply lay the
lintel in place and coat it with fortified QUIKWALL® SBC mix.
8. Vertical control joints are needed to handle stresses and prevent
cracking of the block or QUIKWALL® SBC finish. Spacing between
control joints is determined by wall height. In general the ratio of
control joint spacing to wall height is about 2:1. That is a 2' high wall
should have control joints every 4', a 4' wall every 8', and an 8' wall
every 16' to 20'.
Control joints are also needed at the following points of weakness
and/or high stress concentration.
• At all abrupt changes in wall height
• At all changes in wall thickness, such as those at pipe or duct
columns or pilaster
• Above joints in foundations and floors
• Below joints in roots and floors that bear on the wall
• At a distance of not over half the allowable joint spacing from
bonded intersections or corners
• At one or both sides of all door and window openings unless
other crack control measures are used, i.e., joint
reinforcement or bond beams
Regardless of the control joint design used, rake out the wall joint and
caulk with QUIKRETE® Concrete Repair Caulk.
9. Attach capping sills to the top course by anchoring bolts firmly into
the concrete or QUIKWALL® SBC. Moist-cure the wall after 8 hours
by dampening with a fine spray. Repeat several times daily for 3
days. Roof or floor construction can proceed when the curing is
complete.
For Best Results
• Take extra care that the bottom course is laid properly,
because each succeeding course will simply be stacked on it.
• To ensure proper bonding, make certain that the blocks are
clean and free of any dirt, soil, or grease.
• Before laying the block, remove any burrs and chips from it
with a hammer to get a tight fit. Mix only as much
QUIKWALL® SBC as can be used in 1 hour.
• To obtain the finish you desire, experiment with different
trowels and techniques before applying the QUIKWALL®
SBC coat to your wall.
Here is from thenaturalhome.com
Dry stack concrete block walls use surface bonding cement (SBC)
for additional structural strength - no mortar between blocks
home page » passive solar design chapter » dry stack block detail page ... you are here
Dry stack concrete block (cinder block) technique uses surface bonding cement (SBC) instead of mortar for high thermal mass walls that are in fact stronger than conventionally laid block walls. Only the first course is bedded in grout to establish plumb and level for the wall. The rest of the dry stack block courses are laid without need for any mortar. This building method has been around for well over a century, so it is nothing new or even very unique. SBC was formulated to build million gallon municipal cisterns for water storage; the original recipe used horse hair for the structural fibers! There is absolutely no need for special "dry stack" blocks, but they are available in some areas. Typical concrete blocks are fine as long as the quality is good. And the quality is almost always very good these days, what with computerized forming and automated molding of concrete blocks. Plus, you will likely be buying a local product - block manufacturing yards are to be found in nearly every part of the country.
click here for the main chapter of our free Passive Solar Design eBook
Blocks need not be of any special design; they don't interlock, and best of all you don’t have to know how to lay block! You simply stack the concrete blocks in a running bond pattern and then parge coat both sides with a single layer of fiber reinforced, surface bonding cement. Applied 1/8 inch thick (minimum) to both sides, surface bonding cements have strengths that are superior to conventionally mortared block walls and they look a lot better too (no grout lines)! Once your block walls have been surface bonded, hollow vertical cores (minimum every four foot and alongside every opening) are filled with ready-mix concrete and a #5 rebar for an exceptionally strong heat storage mass. Mortared block walls are just as effective, but dry stack is easier for the unskilled homeowner-builder. You don't need any experience laying block to excel at dry stack with SBC!
Please note that solid, poured in place, concrete walls are just as effective, but outside the skill level of most people. Hiring contractors to build the forms, pour the walls and then return to strip the forms, is always an option when you have the budget. Empty cores in your block walls (those not having structural rebar) should be filled with something for extra thermal mass. There is no advantage to having empty cores in the block walls and absolutely no advantage to filling them with insulation. The more thermal mass in a home, the better. Most clients simply order more concrete grout and fill the empty cores while they fill the structural cores, but some clients opt for using sand/dirt from the site. The only cavaets to using soil to fill the empty block cores is to compact well and "cap" the top of the core with SBC to prevent moisture from penetrating.
One key to thermal performance and indoor air quality is to have waterproof walls and surface bonding cement was originally used to line water tanks. You need to prevent water from traveling through the wall, sucking away energy and presenting possible indoor air quality problems. The same applies to poured-in-place concrete walls - the wall needs to be waterproofed on both sides to prevent water transfer. Several coats of low VOC non-porous latex paint is a good solution for waterproofing the interior of a concrete wall. The exterior footers and wall need a minimum of two heavy coats mop-on waterproofing treatment or better yet, a roll roofing underlayment - sheet bithumin, like Grace® Ice and Water Shield.
One of the most popular questions is: how do you wire a home made out of concrete or block? The answers are varied since there are probably as many different ways as there are electricians, but as with most design elements, look to commercial construction, not residential for the best and most economical solutions.
| In-floor electrical outlets like you see in commercial buildings are one way, knocking holes in the block and running conduit down through the cavities is another, and simply attaching Wire-Mold® strips along the wall is yet another solution. As with most commercial approaches, running conduit ends up being cheaper and sturdier than the residential alternatives used in stick frame construction (bare Romex® run through holes drilled in studs). One of the most visually pleasing and creative ways is shown here. Half-round logs are routered out along the back and holes are cut for the outlet and switch boxes. |  |  |
With any surface bonding cement (SBC), conventional mortared block or poured-in-place cement wall, it is key to note:
do not fill block cores with insulation or foam. This is counter to what you are trying to achieve. The empty cores should be filled with concrete, sand or some other solid thermal mass material.
vibrate the newly poured wall cores thoroughly to avoid air pockets. These tools are relatively inexpensive from companies like Harbor Frieght Tools. Removing air pockets from structural concrete filled cores is very important for ultimate wall strength.
interior walls are surface bonded, so there is no need to stucco or drywall. You can do a finish coat of stucco to attain a particular texture, though, or use a synthetic stucco mixture.
always coat the exterior and interior of your walls with waterproofing. Water absorption and transference must be stopped to maintain interior air quality. A high quality non-porous latex does wonders.
exterior insulation on the walls must be surface bonded with a latex modifier added to allow it to stick to the EPS foam. Reinforce with galvanized chicken wire or expanded lathe for structural integrity.
exterior insulation on the walls must be surface bonded with a latex modifier added to allow it to stick to the EPS foam. Reinforce with galvanized chicken wire or expanded lathe for structural integrity.
If you are not familiar with laying block (mortared or surface bonded), after the corners are stacked six to eight rows high, setting the string line is critical. The corners dictate the walls between - starting from corners, you simply stack block between. You can alternate last blocks, but it is generally the center block and it rarely needs shaved to fit. There are probably as many ways to knot the line block (shown below) as there are masons. "X"ing at the knuckle (full corner end of wooden line block) certainly helps stabilize or you can just wrap the string once or twice around block lengthwise, then anchor back to pin. You can pull in slack a lot easier this way (cinching to line pin), plus it ensures the string line will remain taut and true. While it is possible to simply set the wood line block on corner and tie off with tension alone, having an anchor post (pin as shown) is a little more elegant and saves the string from being subject to "jumping off".
As with most everything in life, there are at least two opinions on the correct usage of the string line (mason line). Most prefer to keep string line a set distance from block (5/8 inch as pictured above with the Marshalltown® line block). This allows you to use your fingers as a quick spacer - as soon as fingers touch line, you know you are about true for stacking (5/8 inch gap). Classic masonry with grouted courses, forces you to hold the block at center pull / cavity opening (fingers inside block to steady and drop plumb). You can't always be looking down on the block, though, and you really don't need to with dry stack. Some masons like the string line right where the blocks are going. You just have to maintain clearance (even if only 1/16 inch) to keep true (nothing should ever touch the string line). It is possible to keep the wall plumb (vertical) and level (horizontal) without a string line reference, but the only way to keep it straight (true) is with a stringline. Wander 1/16 inch off true every coarse and you will find the wall with a 1/2 inch curve before you know it.
The major labor/time saver with dry stack SBC versus mortar block is not having to make sure each and every block is plumb, level and true before setting the next block. When you are rolling along with stacking the block, you never stop to check every single block ... you lay the course just shy of stringline true and then come back to adjust all the blocks over to the line. A large rubber mallet does a quick and efficient job of trueing the wall until you get two or three courses atop the errant block. This is where you notice the great strength provided by friction (six blocks touching the one you want to move) and gravity alone. After the surface bonding cement is applied and structural cores filled, a SBC block wall is actually much stronger than a comparable mortared block wall.
A major time saver is to never cut any blocks for the layout - design around using all full and half blocks. The block layout we normally work with is eight inch wide block (8" wide, 15.625" long, and 7.625" tall). Maintaining a running bond stack (upper block overlaps half of lower block) is easy with eight inch wide since the corner turns on 1/2 of the width (15.625 inch long and eight inch wide). When the design requires change to 12 inch wide block (berming into a hillside) you suddenly need to cut a block every other course. The first course is traditionally all full blocks (12 inch by 15.625 inch long). The second course (as shown below) uses a cut block - one 4 inch and the other what is left over (about 11-1/4" to 11-1/2" long). Half blocks are only used at the end of a wall or doorway opening, never in a corner or on a straight wall run between two corners.
One key to SBC (and any other Portland® cement based stucco, concrete or mortar) is to keep the material moist for the first few days of curing. Any cement based product needs to cure slow and steady for optimal strength - up to a month for a concrete slab. If you want a quality product, get several hand pump sprayers for misting water during construction. Tent and heat the first course with mortar bed - and keep moist - for the first few days of set when temperatures are going to dip below 50 degrees. The same applies to any SBC work later - when dry stacking (or mortar block laying) in a cold climate, you should consider covering the entire structure with string reinforced poly sheeting. The tops of block walls can be spanned with a few beams and clear tarp material draped across all walls. Common roll size is 20' by 100', with 40' by 100' available in some areas (there is also a woven mat material). Commercial projects often leave the plastic "tent" in place for the entire construction, cutting away with razor knives after the ceiling has been oiled and interior is ready to work. Then the clear tarp just falls to the floor and becomes a drop cloth to keep traffic off concrete.
You can purchase surface bonding material at any building supply center or at wholesale (by the pallet) from your block yard. We do not sell it and we are not the manufacturer. Our only interest in proposing SBC as a building method is to help our clients save some money while having the ability to construct their own home with their own hands. Here's a link to a three printed page Adobe® Acrobat® (.PDF) file with the technical data for: Quikwall® brand surface bonding cement. If you don't have Adobe® Acrobat® Reader on your system, take this link for a free download. For a look at common dry stack cinder block construction techniques, please take this link: Quikrete® SBC Project Page. Quikwall's manual is a very helpful do-it-yourself surface bonding cement outline. The manufacturer website is Quikrete.com or you can call their help line at 800-282-5828. Please note many other surface bonding cement manufacturers exist - check with your local block yard for details.
We have always delighted when new professionals become familiar with dry stack cinder block techniques. Cinder block has been a popular commercial building material for ages, but wood has always ruled for residential here in the USA. That's what makes an HTM so economical and functionally sensible - this common commercial style of block or poured-in-place concrete construction. HTM design just adds a coat of surface bonding cement (SBC structural stucco) to stop water transference and exterior wall and horizontal wing insulation for heating and cooling retention. Plus, we throw in a little passive solar design, maybe some shade cloth, and voile, HTM. Concrete and block are very low-tech LOCALLY available products without all the marketing fluff associated with SIPS, ICF pre-packaged insulated forms, special block shapes, and other trick methods. Reinventing the wheel is not necessary ... any local commercial contractor should be more than capable of working on the project. Here's hoping more websites, architects, engineers, and building departments get familiar with a worthy method. For a technique that has been around for centuries, it gets entirely too little attention. But like any product where scant little money is to be made by marketers, dry stack tends to get ignored.
We have always delighted when new professionals become familiar with dry stack cinder block techniques. Cinder block has been a popular commercial building material for ages, but wood has always ruled for residential here in the USA. That's what makes an HTM so economical and functionally sensible - this common commercial style of block or poured-in-place concrete construction. HTM design just adds a coat of surface bonding cement (SBC structural stucco) to stop water transference and exterior wall and horizontal wing insulation for heating and cooling retention. Plus, we throw in a little passive solar design, maybe some shade cloth, and voile, HTM. Concrete and block are very low-tech LOCALLY available products without all the marketing fluff associated with SIPS, ICF pre-packaged insulated forms, special block shapes, and other trick methods. Reinventing the wheel is not necessary ... any local commercial contractor should be more than capable of working on the project. Here's hoping more websites, architects, engineers, and building departments get familiar with a worthy method. For a technique that has been around for centuries, it gets entirely too little attention. But like any product where scant little money is to be made by marketers, dry stack tends to get ignored.
We do not sell any tools, but darbies, pool floats, magnesium hawks, arch raspers and bucket scoops can be found locally at construction tool suppliers. The same tools used for stucco work are used for surface bonding (parge coating) dry stack cinder block. The pool float is a hockey rink shaped applicator preferred by many to work the stucco or SBC into place. A foam handle is nice, if you keep your tools clean. Otherwise, composite handles are much easier to maintain. Magnesium blades are preferred by many for their ability to "open" pores in the cement (versus seal smooth and tight, as with steel blades). Magnesium has a nice "feel", being rust proof and lightweight, yet thick and strong, making it preferred for hawks, floats and darbies. Arch rasps and bucket scoops are the other two images above - specialized tools for unique needs can cut labor time dramatically. The darby, for instance, is a two to four foot long two handed leveler that makes it possible to flat-level large surfaces quickly. Some darbies come with teeth for a sawing action as you level across the wall or floor - others are flat with rounded lips along edge for sawing (smoothing and leveling) more gently at the stucco, plaster or surface bonding cement.
| dry stack block shed plans - details common to any size building Any information presented on this website is inherently limited in scope and only an outline for quick reference. Site, soil, and local code requirements are only the first of many unknown variables. We do not warrant for any errors or omissions. Plans are not presented as construction ready. Local engineering approval must be obtained. |
Power shed plans supplied with initial consultation packet
Saturday, December 18, 2010
Pan Seared Baked Super Crispy Skin Chicken Thighs With Sweet Potato and Veggie Medly
I made this 2 days ago for my Brother and His Wife. They loved it! My sister-in-law thought the skin was the greatest! Super Crispy!!
Pan Seared Baked Super Crispy Skin Chicken Thighs With Sweet Potato and Veggie Medley
4 Chicken Thighs (Very Nicely Browned in a lightly oiled pan)
3 Medium Sweet Potatoes (scrubbed, pricked with a fork)
A Medley of Carrot, cauliflower and broccoli (in bite size pieces) (a cup of each)
Reheat oven to 400F
Put Browned Thighs Face up in a greased pan
Put Sweet Potatoes in a another Greased pan
Spray Sweet Potatoes with oil and put salt + pepper on top
Put in the over for 1 hour
Before the hour is up microwave the medley for 5-6 minutes or blanch in boiling water for the same amount of time.
Serves 4
If more people are eating add more of everything, the same cooking time works for more.
Hope you Enjoy! I sure did.
FruitStripeApe
Thursday, December 16, 2010
Solar Oven Info and More
I was thinking today of more ways to cook things. Solar just came to mind so i was searching online as usual and found a website with lots of designs. Here are a few from there.
 The funnel can be tilted in the direction of the sun.
By Teong H. Tan
DSPC Plan
 For low-sun altitude cooking, below 65 degrees, the two forward triangular panels, on each DSPC side wing, are placed under the trapezoidal base (see photo on the right). In this setting, DSPC functions and performs pretty much the same as the Cookit.
 To cook, first configure DSPC according to the sun altitude. Face the cooker towards the sun. Put foods inside a black metal pot, and enclosed the pot in an oven bag or a clear glass container/casserole. Place the pot in the middle of DSPC’s base. Raise the cooking pot by about two inches above the base, using trivet or wire cage, to bring the pot into the proper focus of the cooker. For high-sun altitude setting, raising the pot allows pot with diameter greater than 7.5 inches to be used because the added reflective panels in the front restrict space available at the base level.
The Reflective Open Box Solar Cooker
Roger Bernard offers a new compact reflective cooker design

I have been very impressed to read, in SBJ #17, that the solar panel cooker (SPC) idea, as publicized by Barbara Kerr and myself in the preceding issue, had met with an abundant response. Even negative results can be of interest when we seek to understand them. For instance, in the comment, "I used a "turkey -size" oven cooking bag and a dark ceramic teapot. Nothing!", there are two interesting clues. First the ceramic teapot was not a good choice because ceramic can be a bad conductor of heat [depending on its density, Ed.]. Food can remain lukewarm, even if the pot is very hot on the outside. And secondly, a turkey is an enormous bird, and using a bag appropriate to hold it may mean that the quantity of food could have been too big for the cooker. Let us not forget that the SPC was designed as a substitute for the traditional box for small quantities of food. The dimensions given for my prototype in SBJ #16 are appropriate only when cooking for one person.
During the 1994 summer, I somewhat improved the SPC's convenience and efficiency by introducing two changes: a new system for creating the greenhouse effect and a more compact design.
Undoubtedly, oven bags are unbeatable for their lightness, but in my city (Lyon, 500,000 inhabitants) there are no oven bags available in the supermarkets. On the other hand, Pyrex salad bowls are very easy to find everywhere in France--even in small towns. Their price (about $4 US) is ten times the price on an oven bag, but they can be used hundreds of times for solar cooking as well as for other purposes in the kitchen. For traveling, however, they are relatively heavy and cumbersome.

Obviously the advantages of such a system are partially offset by extra heat loss from the uninsulated lid. By raising the pot off the ground a further gain is achieved. In fact, my experiments have shown that cooking times with this new system are no longer than with the original design with a salad bowl up-turned over the pot.
In order to improve stability, I reduced the number of panels from five to four. A pleasant surprise was that the removal of the central back panel not only resulted in a more compact and stable cooker, but also improved the efficiency of the reflective surfaces, by permitting multiple reflections between the two remaining vertical panels. This peculiar assembly I propose to call a "reflective open box" (ROB) to distinguish it from the original solar panel cooker (SPC).


 A wooden prop can be used to adjust the front panel (figure 4). The single notch near panel 4 is used to lock this panel in a closed position for storage. Rocks can be placed in the triangular chambers behind panels 1 and 2 to stabilize the cooker in the wind.
In summary, the ROB seems to be a more convenient and efficient design that could replace the original SPC for regular home cooking. Of course, the latter equipped with an oven bag remains a better design if a light-weight, foldable cooker is needed.
Roger Bernard can be contacted at
A.L.E.D.E.S.
Université de Lyon
69 622 - Villeurbanne
France
 There are also plans for making this cooker in a way that it is collapsible.
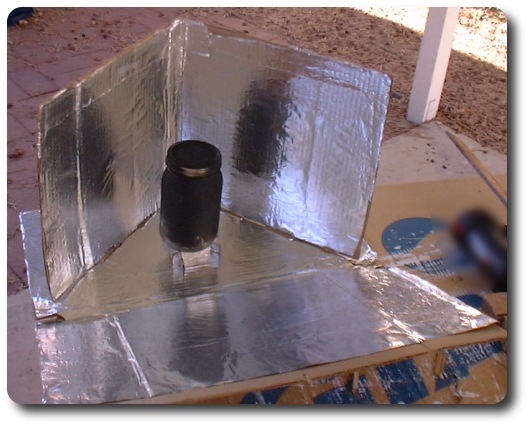
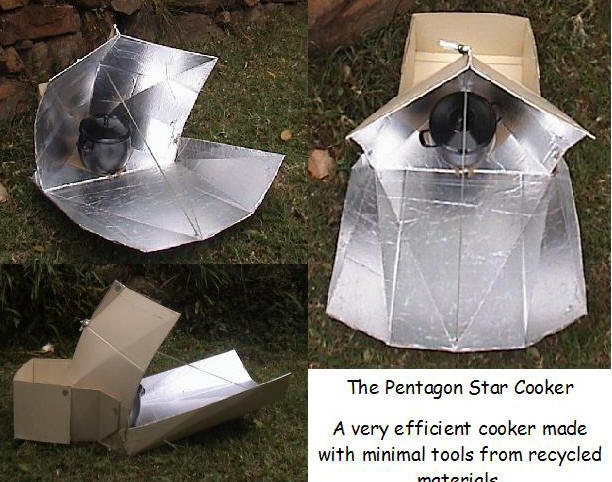
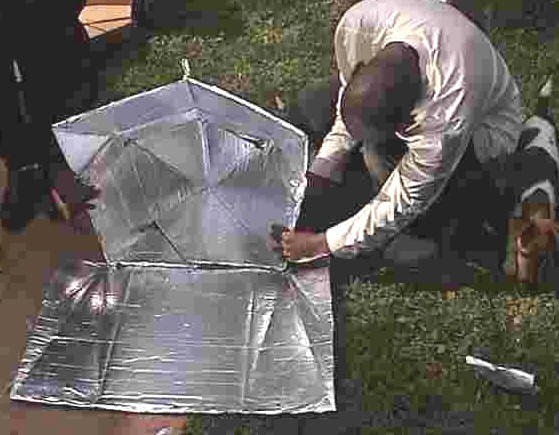
The Pentagon Star Cooker
 I am teaching unemployed people how to make and use solar cookers in KwaZulu-Natal. We have clear winters and cloudy summers and the people I have been helping have little or no money. I developed this cooker for use here and it works so well that I felt it would be of use else ware.
This is a great cooker. Out side the tropics a straight panel cooker battles on all but the best days and this cooker takes advantage of lower sun angles in morning and afternoon. Being more efficient it makes up for the odd cloud in the day. It is stable in wind and if put together with paper fasteners can fold down flat for storage. Seasonal changes are made by adjusting the side flaps up or down.
 Most medium sized boxes work, a short side of 350 mm to 500 mm and a height slightly more than the width works best. Four short cuts and a few simple folds is all that is required there is no waste and a whole box is used.
Paint the un-foiled sections of the cooker to guard against moisture.
To cook, place food in a black pot or black painted jar, place the food and container in an oven bag close up with a clothes peg and place on card board scrap in the back corner of the reflector. Now place in full sun and adjust straight into the sun by the cookers shadow.


 The "Minimum" Solar Box Cooker is a solar oven that you can built quickly from two cardboard boxes.
 Added by Tom SponheimThe "Minimum" Solar Box Cooker is a simple box cooker that can be built in a few hours for very little money. When we designed this cooker, we named it the "Minimum Solar Box Cooker" because, at the time, it represented the simplest design we could devise. What we didn't communicate with that name was that this is a full-power cooker that works very well, and is in no way minimum as far as its cooking power goes.
What You Will Need
Building the Base
 Fold the top flaps closed on the outer box and set the inner box on top and trace a line around it onto the top of the outer box, Remove the inner box and cut along this line to form a hole in the top of the outer box (Figure 1). Decide how deep you want your oven to be. It should be about 1 inch (2.5 cm) deeper than your largest pot and about 1" shorter than the outer box so that there will be a space between the bottoms of the boxes once the cooker is assembled. Using a knife, slit the corners of the inner box down to that height. Fold each side down forming extended flaps (Figure 2). Folding is smoother if you first draw a firm line from the end of one cut to the other where the folds are to go.
 Glue aluminum foil to the inside of both boxes and also to the inside of the remaining top flaps of the outer box. Don't bother being neat on the outer box, since it will never be seen, nor will it experience any wear. The inner box will be visible even after assembly, so if it matters to you, you might want to take more time here. Glue the top flaps closed on the outer box.
  Place some wads of crumpled newspaper into the outer box so that when you set the inner box down inside the hole in the outer box, the flaps on the inner box just touch the top of the outer box (Figure 3). Glue these flaps onto the top of the outer box. Trim the excess flap length to be even with the perimeter of the outer box. Finally, to make the drip pan, cut a piece of cardboard, the same size as the bottom of the interior of the oven and apply foil to one side. Paint this foiled side black and allow it to dry. Put this in the oven so that it rests on the bottom of the inner box (black side up), and place your pots on it when cooking. The base is now finished.
Building the Removable Lid
 Take the large sheet of cardboard and lay it on top of the base. Trace its outline and then cut and fold down the edges to form a lip of about 3" (7.5cm). Fold the corner flaps around and glue to the side lid flaps. (Figure 4). Orient the corrugations so that they go from left to right as you face the oven so that later the prop may be inserted into the corrugations (Figure 6). One trick you can use to make the lid fit well is to lay the pencil or pen against the side of the box when marking (Figure 5). Don't glue this lid to the box; you'll need to remove it to move pots in and out of the oven.
  To make the reflector flap, draw a line on the lid, forming a rectangle the same size as the oven opening. Cut around three sides and fold the resulting flap up forming the reflector (Figure 6). Foil this flap on the inside. To make a prop bend a 12" (30cm) piece of hanger wire as indicated in Figure 6. This can then be inserted into the corrugations as shown.
 Next, turn the lid upside-down and glue the oven bag (or other glazing material) in place. We have had great success using the turkey size oven bag (19" x 23 1/2", 47.5cm x 58.5cm) applied as is, i.e., without opening it up. This makes a double layer of plastic. The two layers tend to separate from each other to form an airspace as the oven cooks. When using this method, it is important to also glue the bag closed on its open end. This stops water vapor from entering the bag and condensing. Alternately you can cut any size oven bag open to form a flat sheet large enough to cover the oven opening.
 Improving Efficiency
The oven you have built should cook fine during most of the solar season. If you would like to improve the efficiency to be able to cook on more marginal days, you can modify your oven in any or all of the following ways:
Hope you Enjoy
FruitStripeApe
Sources
http://solarcooking.wikia.com/wiki/Category:Solar_cooker_plans
http://solarcooking.org/plans/
http://solarcooking.org/
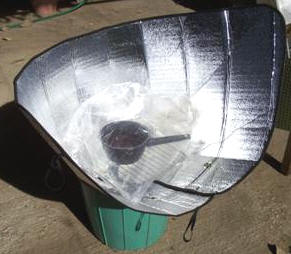
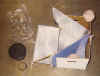
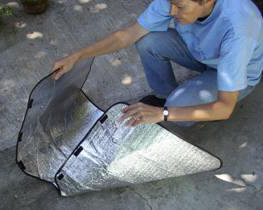
Windshield Shade Solar Funnel Cooker
While experimenting with various designs of cookers over the past year to introduce in the indigenous communities where I live and work in southern Mexico, I hit upon an utterly simple way to make an instant portable solar oven. Taking a reflective accordion-folded car windshield shade, you can turn it into a version of the solar funnel, by simply sewing on little Velcro tabs along the long notched side. Here’s how:
 | Materials needed:
|
-
 Lay the sunshade out with the notched side toward you, as above.
 - Cut the Velcro into three pieces, each about 4 cm. or 1 ½ inches long.
- Hand sew one half of each piece, evenly spaced, onto the edge to the left of the notch; sew the matching half of each piece onto the underneath size to the right of the notch, so that they fit together when the two sides are brought together to form a funnel. (see below) Note: I first tried sewing these on a sewing machine, but found it cut through the reflective material.
- Press the Velcro pieces together, and set the funnel on top of a bucket or a round or rectangular plastic wastebasket.
- Place a black pot on top of a square cake rack, placed inside a plastic baking bag. A standard size rack in the U.S. is 25 cm. (10 in.). This is placed inside the funnel, so that the rack rests on the top edges of the bucket or wastebasket. Since the sunshade material is soft and flexible, the rack is necessary to support the pot. It also allows the suns rays to shine down under the pot and reflect on all sides. If such a rack is not available, a wire frame could be made to work as well. Note: the flexible material will squash down around the sides of the rack.
The funnel can be tilted in the direction of the sun.A stick placed across from one side of the funnel to the other helps to stabilize it in windy weather. (see below)
After cooking, simply fold up your “oven” and slip the elastic bands in place for easy travel or storage.
I have found this totally simple solar oven extremely practical, as it is so lightweight and easy to carry along anywhere. But in addition, it has reached a higher temperature in a shorter time than all the other models I have experimented with so far (I haven’t used a parabolic) - a little above 350 degrees F. I have cooked black beans in about the same amount of time as on a gas stove; I’ve used it to bake breads, granola, brownies, lasagna, all sorts of vegetables, and to purify water. The sunshade may not be available everywhere, but I suspect it can be found in most urban areas, since I found it here in southern Mexico. The Velcro was also available in fabric stores. Cost of the sunshade was about $3.00 USD; the Velcro about $.25.
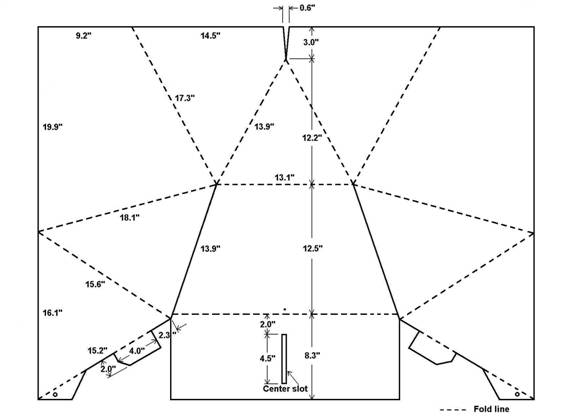
The Dual-Setting Panel Cooker (DSPC)
By Teong H. Tan
When I was living in Malaysia, a country very close to the Equator, my homemade Cookit performed less efficiently when the sun altitude was very high. It appears that the sun altitude range, in the Tropics and some Temperate Zone during the summer, may be too large for fixed setting panel cooker to perform efficiently throughout. The Dual-Setting Panel Cooker (DSPC) described here is designed to lessen this effect, by using two different settings, to better concentrate sunlight according to the sun altitude.
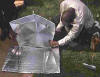
DSPC is made from a single sheet of cardboard or plasticboard, measuring 4’ x 3’, with aluminum foil on one side (see DSPC plan below). DSPC is low cost, simple and quick to construct, and it can also be mass-produced easily.
First draw DSPC pattern, according to plan, onto a 4’ x 3’ cardboard. Cut along the solid lines, and fold along the dash lines. Make sure all fold lines are well folded so that the cooker can freely assume its proper shape when set up. Make the center slot width equivalent to the thickness of two sheets of cardboard stack together. Next glue on the aluminum foil, and the cooker is ready for use.
DSPC Plan
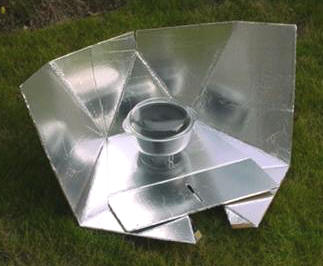
For low-sun altitude cooking, below 65 degrees, the two forward triangular panels, on each DSPC side wing, are placed under the trapezoidal base (see photo on the right). In this setting, DSPC functions and performs pretty much the same as the Cookit.The forward rectangular panel can either lie flat or propped up, with a small object, for the proper reflection angle as required.
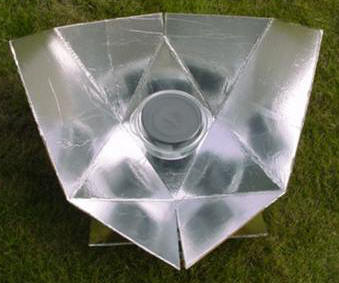
For high-sun altitude cooking, above 60 degrees, the two forward triangular panels, on each DSPC side wing, are placed over the trapezoidal base. The two small flaps will fit inside the center slot, on the forward rectangular panel, to hold the cooker shape (see photo on the right). In this setting, DSPC performs more efficiently with extra panels.
If required, tying the two forward triangular flaps together with a short string will bring the two forward triangular panels even closer.
To cook, first configure DSPC according to the sun altitude. Face the cooker towards the sun. Put foods inside a black metal pot, and enclosed the pot in an oven bag or a clear glass container/casserole. Place the pot in the middle of DSPC’s base. Raise the cooking pot by about two inches above the base, using trivet or wire cage, to bring the pot into the proper focus of the cooker. For high-sun altitude setting, raising the pot allows pot with diameter greater than 7.5 inches to be used because the added reflective panels in the front restrict space available at the base level.The Reflective Open Box Solar Cooker
Roger Bernard offers a new compact reflective cooker design

During the 1994 summer, I somewhat improved the SPC's convenience and efficiency by introducing two changes: a new system for creating the greenhouse effect and a more compact design.
Undoubtedly, oven bags are unbeatable for their lightness, but in my city (Lyon, 500,000 inhabitants) there are no oven bags available in the supermarkets. On the other hand, Pyrex salad bowls are very easy to find everywhere in France--even in small towns. Their price (about $4 US) is ten times the price on an oven bag, but they can be used hundreds of times for solar cooking as well as for other purposes in the kitchen. For traveling, however, they are relatively heavy and cumbersome.
Obviously the advantages of such a system are partially offset by extra heat loss from the uninsulated lid. By raising the pot off the ground a further gain is achieved. In fact, my experiments have shown that cooking times with this new system are no longer than with the original design with a salad bowl up-turned over the pot.
In order to improve stability, I reduced the number of panels from five to four. A pleasant surprise was that the removal of the central back panel not only resulted in a more compact and stable cooker, but also improved the efficiency of the reflective surfaces, by permitting multiple reflections between the two remaining vertical panels. This peculiar assembly I propose to call a "reflective open box" (ROB) to distinguish it from the original solar panel cooker (SPC).
Construction
 A wooden prop can be used to adjust the front panel (figure 4). The single notch near panel 4 is used to lock this panel in a closed position for storage. Rocks can be placed in the triangular chambers behind panels 1 and 2 to stabilize the cooker in the wind.
In summary, the ROB seems to be a more convenient and efficient design that could replace the original SPC for regular home cooking. Of course, the latter equipped with an oven bag remains a better design if a light-weight, foldable cooker is needed.
Roger Bernard can be contacted at
A.L.E.D.E.S.
Université de Lyon
69 622 - Villeurbanne
France
 There are also plans for making this cooker in a way that it is collapsible.
The Pentagon Star Cooker
 I am teaching unemployed people how to make and use solar cookers in KwaZulu-Natal. We have clear winters and cloudy summers and the people I have been helping have little or no money. I developed this cooker for use here and it works so well that I felt it would be of use else ware.
This is a great cooker. Out side the tropics a straight panel cooker battles on all but the best days and this cooker takes advantage of lower sun angles in morning and afternoon. Being more efficient it makes up for the odd cloud in the day. It is stable in wind and if put together with paper fasteners can fold down flat for storage. Seasonal changes are made by adjusting the side flaps up or down.
 Most medium sized boxes work, a short side of 350 mm to 500 mm and a height slightly more than the width works best. Four short cuts and a few simple folds is all that is required there is no waste and a whole box is used.
Paint the un-foiled sections of the cooker to guard against moisture.
To cook, place food in a black pot or black painted jar, place the food and container in an oven bag close up with a clothes peg and place on card board scrap in the back corner of the reflector. Now place in full sun and adjust straight into the sun by the cookers shadow.

Contents[show] |
What You Will Need
- Two cardboard boxes. We would suggest that you use an inner box that is at least 15 inch x 15 inch (38 cm x 38 cm), but bigger is better. The outer box should be larger than the small box all around, but it doesn't matter how much bigger, as long as there is a half inch (1.5cm) or more of an airspace between the two boxes. The distance between the two boxes does not have to be equal all the way around. Also, keep in mind that it is very easy to adjust the size of a cardboard box by cutting and gluing it.
- One sheet of cardboard to make the lid. This piece must be approximately 2 to 3 inch (4 to 8 cm) larger all the way around than the top of the finished cooker (the outer box).
- One small roll of aluminum foil.
- One can of flat-black spray paint (look for the words "non-toxic when dry") or one small jar of black tempera paint. Some people have reported making their own paint out of soot mixed with wheat paste.
- At least 8 ounces (250 g) of white glue or wheat paste.
- One Reynolds Oven Cooking Bag®. These are available in almost all supermarkets in the U.S. and they can be mail-ordered from Solar Cookers International. They are rated for 400 °F (204 °C) so they are perfect for solar cooking. They are not UV-resistant; thus they will become more brittle and opaque over time and may need to be replaced periodically. A sheet of glass can also be used, but this is more expensive and fragile, and doesn't offer that much better cooking except on windy days.
Building the Base


Building the Removable Lid


Improving Efficiency
The oven you have built should cook fine during most of the solar season. If you would like to improve the efficiency to be able to cook on more marginal days, you can modify your oven in any or all of the following ways: - Make pieces of foiled cardboard the same size as the oven sides and place these in the wall spaces.
- Make a new reflector the size of the entire lid (see photo above).
- Make the drip pan using sheet metal, such as aluminum flashing. Paint this black and elevate this off the bottom of the oven slightly with small cardboard strips.
Hope you Enjoy
FruitStripeApe
Sources
http://solarcooking.wikia.com/wiki/Category:Solar_cooker_plans
http://solarcooking.org/plans/
http://solarcooking.org/
Wednesday, December 15, 2010
Eating Insects (Entomophagy) Part 2. Recipes
Here are some recipes I've found online.
http://www.ent.iastate.edu/misc/insectsasfood.html
Stir in rice. Cover; remove from heat and let stand five minutes.
Bake.
A tasty surprise in every one!
Boil dragonfly nymphs. Eat them.
http://www.faculty.de.gcsu.edu/~cbader/ghprecwithinsects.html
http://entweb.clemson.edu/k12/recipes.htm
4 T. butter
¼ C. flour
2 C. milk
¼ C. water chestnuts, chopped
3 egg yolks
1 C. sherry
1 pkg. frozen chopped broccoli
1 C. mealworms, chopped
Sauté chives in butter. Strain melted butter into another pan and stir flour into butter. Add milk, water chestnuts, egg yolks, sherry, broccoli and chives. Stir vigorously over heat until sauce is thickened and smooth. Add insects, salt to taste, and serve over rice or egg noodles.
1¼ C. soft bread crumbs
1 C. fresh insects
1 egg, beaten
1¼ tsp. salt
1 T. celery, chopped
1/8 tsp. pepper
2 T. onions, minced
4 T. butter
Combine corn, ¼ cup crumbs, insects, eggs, salt, celery, pepper, onion and 2 T. butter broken into small pieces. Turn the mixture into a small greased, 1-qt casserole. Melt remaining butter, mix with remaining crumbs and sprinkle over top of casserole. Bake at 350º F for 40 minutes or until crumbs are brown and corn is tender.
6 cloves garlic, crushed
1 cup mealworms
Melt butter in pan. Reduce heat. Sauté garlic in butter and add insects. Sauté for an additional 10-15 min., stirring occasionally.
4¼ C. water
1 T. safflower oil
1 sprig each marjoram and thyme
2 bay leaves
¼ onion
1 8-oz pkg spaghetti
6-8 T. butter
¼ t. salt and pepper
Olive oil, to taste
3-4 T. chopped almonds
10 sprigs, parsley
1 lb. purple basil
1 lb. ricotta cheese
Boil water. Add safflower oil, marjoram, thyme, bay leaves, and onion. Bring to a boil and add spaghetti. Cook 20 minutes. Strain spaghetti and herbs, and rinse with cold water.
Place butter in frying pan over low heat. Add drained spaghetti, salt, and pepper. Finely chop basil and almonds, and mix with ricotta and olive oil. Add to spaghetti mixture and heat through. Top with mealworms and serve.
http://www.life.illinois.edu/ib/109/2010%20Lab/2010%20Lab%20Handouts/8_Edible_insects/recipes.html
Pipian Grashoppers (Our grasshopper tacos)
Original recipe:
2 scallions, cut in pieces
1/2 lb. tomatillos, cut in pieces
5 radish leaves
2 leaves epazote
5 serrano chiles
1 handful parsley
5 garlic cloves, mashed
3 Tbsp. corn oil
1 Tbsp. olive oil
1/2 cup pumpkin seeds, toasted and ground
1/4 cup sesame seeds, toasted and ground
3 cumin seeds, toasted
1/2 lb. grasshoppers
1/8 tsp. salt
1 cup bouillon
tortillas, for serving
Preheat the oven to 350 degrees F. Place the grasshoppers on a baking sheet and roast for 10 minutes. Place the scallions, tomatillos, radish leaves, epazote, serrano chiles, parsley, and garlic in a blender or food processor and liquefy. Heat the combined oils in a frying pan. Add the ground pumkin seeds and fry over medium heat, stirring to prevent burning. Add the ground sesame seeds and the toasted cumin seeds. Season with salt, mixing thoroughly. Add the bouillon a little at a time, stirring, and cook until thickened. Add the roasted grasshoppers. Spoon the filling into the warmed tortillas and serve.
Class modifications:
We didn't have access to a lot of the salsa ingredients so we served the tacos with store bought salsa verde, some sour cream would probably go pretty well too. The roasted grasshoppers were extremely tough to chew in the tacos. We mixed the seeds and oils with one can of vegetable stock instead of bouillon, and added the grasshoppers one hour before serving. The extra time marinating softened the exoskeletons up enough to chew well. In the future, marinating the roasted grasshoppers overnight would probably be better.
Braised Ant Brood (Our ant pupae on toast)
Original recipe:
1/2 lb. ant larvae and pupae
1 stick butter
1/8 tsp. pepper
1/8 tsp. salt
Powdered anise, to taste
1 cup white wine
Melt the butter in a frying pan over low heat. Fry the larvae and pupae until they turn a white, opaque color, then add salt and pepper, the anise, and white wine. Serve with bread.
Class modifications:
We marinated the pupae in the white wine for a few hours before class and added everything to the pan as soon as the butter was melted. There were complaints that it was too buttery, so at the least we should cut the butter amount by half in the future.
Chicatana Empanadas
Original recipe:
1 cup water
w cup granulated sugar
1/2 lb. ants, ground or whole (we used whole, much better visual image)
1/2 tsp. pectin
1 cup flour to sprinkle
1 lb. puff pastry dough
1 egg white, beaten, for pasting
1 egg yolk, beaten, for brushing
To prepare the filling, place the sugar and one cup of water in a pan and bring to a steady boil until it reaches a honeylike consistency. Add the ground or whole ants, and stir until a gel forms. Remove from heat and let cool. Stir in the pectin and set aside. Preheat oven to 300 degrees F. Sprinkle flour on a pastry board, and roll out the pastry dough to a thickness of 1/4 inch. Use a round cookie cutter, between 2 and 3 inches in diameter, or a drinking glass with a floured rim, and cut circles out of the rolled out dough. Place some of the filling in the center of each dough circle. Spread a bit of egg white around the top edge of each circle. Fold in half to form a half moon and press outside edge with a fork to seal. Brush with egg yolk. Place on a greased cookie sheet about an inch apart. Bake at 300 degrees F until golden brown.
Class modifications:
We forgot to buy pectin so we cooked the filling a little longer to increase the gelness, but you have to keep stirring or else it will start to burn. We also bought the pastry dough sheets and didn't roll them out so they were a little thicker than 1/4 inch, but we liked the doughiness of the final product.
Silkworm pupae stir-fry
2 cans of silkworm pupae
1 Tbsp oil
1 onion, chopped
1 red pepper, chopped
1 yellow pepper, chopped
1/2 lb. pea pods
Spicy sauce to taste
The silkworm pupae are canned with a sauce that we personally find disgusting but other people might like. To remove the sauce you soak the puape in saltwater for 3-12 hours depending on how much you dislike the sauce. Change the water every hour to extract every last drop. Then roast the silkworms at 400 degrees F for 10 minutes. The longer the roasting time, the crunchier the insects. Heat the oil in a wok at medium heat and add the onions. Stir until they are beginnging to soften and add the peppers. Stir a minute more than add the silkworms. One more minute and add the pea pods. Add as much spicy sauce as you would like. We use Schezuan spicy sauce and add about 5 Tbsp full. Serve by itself or with rice. You can add any other veggies you like as well.
Raising Mealworms
Crickets are escape artists!!! It is a good idea to put a rock on top of the lid to ensure that you don't accidentally knock it off. It is also a good idea to float the container in a tub of soapy water. Unlike mealworms, it is almost impossible to recapture crickets once they escape, and crickets may start infesting your house if they get out while you're on vacation (don't panic, though... they rarely cause any real damage to food or furnishings). I would really recommend that you start with mealworms if you are new to insect raising.
Well that's it for part 2. More to come.
Hope you Enjoy,
FruitStripeApe
http://www.ent.iastate.edu/misc/insectsasfood.html
Iowa State University's Tasty Insect Recipes
Bug Blox
Ingredients:
- 2 large packages gelatin
- 2 1/2 cups boiling water (do not add cold water)
Directions:
Stir boiling water into gelatin. Dissolve completely. Stir in dry-roasted leafhoppers. Pour mixture slowly into 13 x 9 inch pan. Chill at least 3 hours. BLOX will be firm after 1 hour, but may be difficult to remove from pan. Cutting blox: dip bottom pan in warm water 15 seconds to loosen gelatin. Cut shapes with cookie cutters all the way through gelatin. Lift with index finger or metal spatula. If blox stick, dip pan again for a few seconds.Banana Worm Bread
Ingredients:
- 1/2 cup shortening
- 3/4 cup sugar
- 2 bananas, mashed
- 2 cups flour
- 1 teaspoon soda
- 1 teaspoon salt
- 1/2 cup chopped nuts
- 2 eggs
- 1/4 cup dry-roasted army worms
Directions:
Mix together all ingredients. Bake in greased loaf pan at 350 degrees for about 1 hour.Rootworm Beetle Dip
Ingredients:
- 2 cup low-fat cottage cheese
- 1 1/2 teaspoon lemon juice
- 2 tablespoons skim milk
- 1/2 cup reduced calorie mayonnaise
- 1 tablespoon parsley, chopped
- 1 tablespoon onion, chopped
- 1 1/2 tsp. dill weed
- 1 1/2 tsp. Beau Monde
- 1 cup dry-roasted rootworm beetles
Directions:
Blend first 3 ingredients. Add remaining ingredients and chill.Chocolate Chirpie Chip Cookies
Ingredients:
- 2 1/4 cup flour
- 1 tsp. baking soda
- 1 tsp. salt
- 1 cup butter, softened
- 3/4 cup sugar
- 3/4 cup brown sugar
- 1 tsp. vanilla
- 2 eggs
- 1 12-ounce chocolate chips
- 1 cup chopped nuts
- 1/2 cup dry-roasted crickets
Directions:
Preheat oven to 375. In small bowl, combine flour, baking soda and salt; set aside. In large bowl, combine butter, sugar, brown sugar and vanilla; beat until creamy. Beat in eggs. Gradually add flour mixture and insects, mix well. Stir in chocolate chips. Drop by rounded measuring teaspoonfuls onto ungreased cookie sheet. Bake for 8-10 minutes.Crackers and Cheese Dip with Candied Crickets
Ingredients:
- 8 oz. cream cheese
- 4 oz. shredded cheddar cheese
- 1 tsp. Worchestershire sauce
- 2 tsp. chopped onions
- 1 tsp. chopped green pepper
- 2 tsp Miracle Whip®
- candied crickets
Directions:
Soften cream cheese. Introduce remaining ingredients. Spread mixture on cracker and top with a candied cricket.Mealworm Fried Rice
Ingredients:
- 1 egg, beaten
- 1 tsp. oil
- 3/4 c. water
- 1/4 c. chopped onions
- 4 tsp. soy sauce
- 1/8 tsp. garlic powder
- 1 c. minute rice
- 1 c. cooked mealworms
Directions:
Scramble egg in a saucepan, stirring to break egg into pieces. Add water, soy sauce, garlic and onions. Bring to a boil.Stir in rice. Cover; remove from heat and let stand five minutes.
Corn Borer Cornbread Muffins
Ingredients:
- Cornbread mix
- 3/4 c. dry roasted corn borers
Directions:
Prepare batter according to instructions. Stir in insects.Bake.
Chocolate Covered Grasshoppers
Ingredients:
- baker's chocolate
- candied crickets
Directions:
Melt baker's chocolate in double boiler. Fill molds halfway with chocolate, add grasshoppers, fill rest of the way.A tasty surprise in every one!
http://www.frogsonice.com/froggy/recipes.shtml
Parcht Locusts
This dish was discovered by William Dampier in 1687, while visiting the Bashee Islands (located between the Philippines and Taiwan). He described it in A New Voyage Round the World:They had another Dish made of a sort of Locusts, whose Bodies were about an Inch and an half long, and as thick as the top of one's little Finger; with large thin Wings, and long and small Legs. ... The Natives would go out with small Nets, and take a Quart at one sweep. When they had enough, they would carry them home, and parch them over the Fire in an earthen Pan; and then their Wings and Legs would fall off, and their Heads and Backs would turn red like boil'd Shrimps, being before brownish. Their Bodies being full, would eat very moist, their Heads would crackle in one's Teeth. I did once eat of this Dish, and liked it well enough....That part about the crispy heads sounds particularly appetizing, doesn't it?
Locust Stew
Here's another locust recipe, this one developed by American pioneers. It's quoted from Calvin W. Schwabe's Unmentionable Cuisine (University Press of Virginia, 1979).Locusts and grasshoppers are prepared for cooking by removing the wings, the small legs, and the distal portion of the hind legs. Then pull off the head, withdrawing any attached viscera. Boil prepared Rocky Mountain locusts in salted water. Add assorted cut-up vegetables, butter, salt, and vinegar to the broth and cook until the vegetables are tender. Serve as a thick soup or over boiled rice as a main dish.Apparently, modern gourmands have lost the taste for crunchy locust heads.
Bee Grubs in Coconut Cream (Mang Non Won)
This is a Thai recipe, also from Unmentionable Cuisine.Marinate bee grubs, sliced onions, and citrus leaves in coconut cream containing some pepper. Wrap in pieces of linen and steam. Serve as a topping for rice.
Dragonfly Nymphs (Mang por)
This recipe from Laos, also quoted from Unmentionable Cuisine, is simplicity itself. Most frogs, however, skip the first step and proceed directly to the second.Boil dragonfly nymphs. Eat them.
http://www.faculty.de.gcsu.edu/~cbader/ghprecwithinsects.html
Dry Roasted Grasshoppers
Spread fresh, frozen and cleaned insects on paper towels on a cookie sheet. Bake at 200° for 1-2 hours until desired state
of dryness is reached. Check state of dryness by attempting to crush insect with spoon. From Orkin
Garlic Butter Fried Grasshoppers
1/4 cup butter
6 cloves garlic, crushed
1 cup cleaned insects*
Melt butter in fry pan. Reduce heat. Sauté garlic in butter for 5 minutes. Add insects. Continue sautéing for 10 - 15
minutes, stirring occasionally. From Orkin
Grasshopper Fritters
from 'Ronald Taylor's "Butterflies in My Stomach"
3/4 cup sifted flour
1 tsp. baking powder
1 tsp. salt
3/4 c milk
1 egg, slightly beaten
1 c grasshoppers
1 pt. heavy cream beaten stiff
Sift flour, baking powder and salt together into a bowl. Slowly add milk and beat until smooth. Add egg and beat well.
Pluck off grasshopper wings and legs, heads optional. Dip insects in egg batter and deep fry. Salt and serve.
from Amazing Grasshopper Recipes.
Popcorn Crunch
Here's an easy treat to prepare and take to the drive-in movie. The kids will love it.
1/2 cup butter, melted
1/2 cup honey
3 quarts popcorn, popped
1 cup dry roasted insects, chopped
Blend the butter and honey together in a saucepan and heat gently. Mix the popcorn with the insects and pour the
butter-honey mixture over it. Mix well. Spread on a cookie sheet in a thin layer. Bake at 350° 10 to 15 minutes, or until
crisp. Break into bite-sized pieces. From Orkin
http://entweb.clemson.edu/k12/recipes.htm
Insect Divan
¼ C. chives, chopped4 T. butter
¼ C. flour
2 C. milk
¼ C. water chestnuts, chopped
3 egg yolks
1 C. sherry
1 pkg. frozen chopped broccoli
1 C. mealworms, chopped
Sauté chives in butter. Strain melted butter into another pan and stir flour into butter. Add milk, water chestnuts, egg yolks, sherry, broccoli and chives. Stir vigorously over heat until sauce is thickened and smooth. Add insects, salt to taste, and serve over rice or egg noodles.
Maize Casserole
3 C. fresh corn cut from cob1¼ C. soft bread crumbs
1 C. fresh insects
1 egg, beaten
1¼ tsp. salt
1 T. celery, chopped
1/8 tsp. pepper
2 T. onions, minced
4 T. butter
Combine corn, ¼ cup crumbs, insects, eggs, salt, celery, pepper, onion and 2 T. butter broken into small pieces. Turn the mixture into a small greased, 1-qt casserole. Melt remaining butter, mix with remaining crumbs and sprinkle over top of casserole. Bake at 350º F for 40 minutes or until crumbs are brown and corn is tender.
Garlic Butter Fried Insects
¼ C. butter6 cloves garlic, crushed
1 cup mealworms
Melt butter in pan. Reduce heat. Sauté garlic in butter and add insects. Sauté for an additional 10-15 min., stirring occasionally.
Mealworm Spaghetti
1 pound mealworms, roasted and diced4¼ C. water
1 T. safflower oil
1 sprig each marjoram and thyme
2 bay leaves
¼ onion
1 8-oz pkg spaghetti
6-8 T. butter
¼ t. salt and pepper
Olive oil, to taste
3-4 T. chopped almonds
10 sprigs, parsley
1 lb. purple basil
1 lb. ricotta cheese
Boil water. Add safflower oil, marjoram, thyme, bay leaves, and onion. Bring to a boil and add spaghetti. Cook 20 minutes. Strain spaghetti and herbs, and rinse with cold water.
Place butter in frying pan over low heat. Add drained spaghetti, salt, and pepper. Finely chop basil and almonds, and mix with ricotta and olive oil. Add to spaghetti mixture and heat through. Top with mealworms and serve.
http://www.life.illinois.edu/ib/109/2010%20Lab/2010%20Lab%20Handouts/8_Edible_insects/recipes.html
Pipian Grashoppers (Our grasshopper tacos)
Original recipe:
2 scallions, cut in pieces
1/2 lb. tomatillos, cut in pieces
5 radish leaves
2 leaves epazote
5 serrano chiles
1 handful parsley
5 garlic cloves, mashed
3 Tbsp. corn oil
1 Tbsp. olive oil
1/2 cup pumpkin seeds, toasted and ground
1/4 cup sesame seeds, toasted and ground
3 cumin seeds, toasted
1/2 lb. grasshoppers
1/8 tsp. salt
1 cup bouillon
tortillas, for serving
Preheat the oven to 350 degrees F. Place the grasshoppers on a baking sheet and roast for 10 minutes. Place the scallions, tomatillos, radish leaves, epazote, serrano chiles, parsley, and garlic in a blender or food processor and liquefy. Heat the combined oils in a frying pan. Add the ground pumkin seeds and fry over medium heat, stirring to prevent burning. Add the ground sesame seeds and the toasted cumin seeds. Season with salt, mixing thoroughly. Add the bouillon a little at a time, stirring, and cook until thickened. Add the roasted grasshoppers. Spoon the filling into the warmed tortillas and serve.
Class modifications:
We didn't have access to a lot of the salsa ingredients so we served the tacos with store bought salsa verde, some sour cream would probably go pretty well too. The roasted grasshoppers were extremely tough to chew in the tacos. We mixed the seeds and oils with one can of vegetable stock instead of bouillon, and added the grasshoppers one hour before serving. The extra time marinating softened the exoskeletons up enough to chew well. In the future, marinating the roasted grasshoppers overnight would probably be better.
Braised Ant Brood (Our ant pupae on toast)
Original recipe:
1/2 lb. ant larvae and pupae
1 stick butter
1/8 tsp. pepper
1/8 tsp. salt
Powdered anise, to taste
1 cup white wine
Melt the butter in a frying pan over low heat. Fry the larvae and pupae until they turn a white, opaque color, then add salt and pepper, the anise, and white wine. Serve with bread.
Class modifications:
We marinated the pupae in the white wine for a few hours before class and added everything to the pan as soon as the butter was melted. There were complaints that it was too buttery, so at the least we should cut the butter amount by half in the future.
Chicatana Empanadas
Original recipe:
1 cup water
w cup granulated sugar
1/2 lb. ants, ground or whole (we used whole, much better visual image)
1/2 tsp. pectin
1 cup flour to sprinkle
1 lb. puff pastry dough
1 egg white, beaten, for pasting
1 egg yolk, beaten, for brushing
To prepare the filling, place the sugar and one cup of water in a pan and bring to a steady boil until it reaches a honeylike consistency. Add the ground or whole ants, and stir until a gel forms. Remove from heat and let cool. Stir in the pectin and set aside. Preheat oven to 300 degrees F. Sprinkle flour on a pastry board, and roll out the pastry dough to a thickness of 1/4 inch. Use a round cookie cutter, between 2 and 3 inches in diameter, or a drinking glass with a floured rim, and cut circles out of the rolled out dough. Place some of the filling in the center of each dough circle. Spread a bit of egg white around the top edge of each circle. Fold in half to form a half moon and press outside edge with a fork to seal. Brush with egg yolk. Place on a greased cookie sheet about an inch apart. Bake at 300 degrees F until golden brown.
Class modifications:
We forgot to buy pectin so we cooked the filling a little longer to increase the gelness, but you have to keep stirring or else it will start to burn. We also bought the pastry dough sheets and didn't roll them out so they were a little thicker than 1/4 inch, but we liked the doughiness of the final product.
The following recipes are not from Creepy Crawly Cuisine, purely our ideas of what might work.
Silkworm pupae stir-fry
2 cans of silkworm pupae
1 Tbsp oil
1 onion, chopped
1 red pepper, chopped
1 yellow pepper, chopped
1/2 lb. pea pods
Spicy sauce to taste
The silkworm pupae are canned with a sauce that we personally find disgusting but other people might like. To remove the sauce you soak the puape in saltwater for 3-12 hours depending on how much you dislike the sauce. Change the water every hour to extract every last drop. Then roast the silkworms at 400 degrees F for 10 minutes. The longer the roasting time, the crunchier the insects. Heat the oil in a wok at medium heat and add the onions. Stir until they are beginnging to soften and add the peppers. Stir a minute more than add the silkworms. One more minute and add the pea pods. Add as much spicy sauce as you would like. We use Schezuan spicy sauce and add about 5 Tbsp full. Serve by itself or with rice. You can add any other veggies you like as well.
Ant Brood Tacos
- 2 tablespoons butter or peanut oil?
1/2 pound ant larvae and pupae
3 serrano chilies, raw, finely chopped
1 tomato, finely chopped
Pepper and Cumin, to taste
Oregano, to taste
1 handful cilantro, chopped
Taco shells, to serve
http://www.grubco.com/ Is the only bug source I've found so far.
Raising Mealworms
Raising mealworms (Tenebrio Molitor) is quite easy and recommended for the beginner. Simply take a flat plastic tub with a lid, fill it with an inch or so of oats or other grain, put in a slice of potato, carrot or other hard vegetable as a source of water, and then deposit your mealworms!
Make sure to replace the slice of potato fairly frequently, otherwise you will be growing mold instead of mealworms.
The mealworms you get at the store are in their larval stage, and it may be a few months before they mature into beetles, so be patient. 100 mealworm larvae is a good colony start if you are not going to be eating them very often. If you wish to make insect protein a regular part of your diet, you can obtain mealworms in bulk from reptile food supply companies and start a large colony (5000 or more is the way to start in this case).
If you have an ant problem in your area, you should float the mealworm tub in a dish of soapy water to prevent ants from infesting your grain. However, unlike crickets, mealworms are unlikely to escape unless you are hideously careless.
Raising Crickets
 Crickets are quite easy to raise and prepare, and the main problem is making sure that they don't escape. Crickets can be kept in any fairly large container with high sides and a tight fitting lid. An aquarium is a good choice. Put a couple inches of potting soil on the bottom of the container.
This will be where the crickets deposit their eggs. Put several egg cartons in the aquarium for the crickets to roost on. Then, place a small container of grains and vegetable scraps in for food, and a container of moist cotton balls for water. Add 50-100 crickets. Mist the potting soil lightly every few days, and make sure that the crickets always have fresh food. You can probably start harvesting the crickets within a few months.Crickets are quite easy to raise and prepare, and the main problem is making sure that they don't escape. Crickets can be kept in any fairly large container with high sides and a tight fitting lid. An aquarium is a good choice. Put a couple inches of potting soil on the bottom of the container.Crickets are escape artists!!! It is a good idea to put a rock on top of the lid to ensure that you don't accidentally knock it off. It is also a good idea to float the container in a tub of soapy water. Unlike mealworms, it is almost impossible to recapture crickets once they escape, and crickets may start infesting your house if they get out while you're on vacation (don't panic, though... they rarely cause any real damage to food or furnishings). I would really recommend that you start with mealworms if you are new to insect raising.
Well that's it for part 2. More to come.
Hope you Enjoy,
FruitStripeApe
Tuesday, December 14, 2010
Peanut Butter Buddy Bars
I'm making a batch of these right as i type this. Mmmm..... The peanut butter smells so good baking.
Chocolate Peanut Buddy Bars
Hope you Enjoy,
FruitStripeApe
- 1 cup creamy or chunky peanut butter
6 tablespoons butter or margarine, softened
1 1/4 cups granulated sugar
3 large eggs
1 teaspoon vanilla extract
1 cup all-purpose flour
1/4 teaspoon salt
1 3/4 cups (11.5-ounce package) Milk Chocolate chips, divided use
- Preheat oven to 350ºF (175ºC).
- Beat peanut butter and butter in large mixer bowl until smooth. Beat in sugar, eggs and vanilla extract. Beat in flour and salt. Stir in 1 cup morsels. Spread into ungreased 13 x 9-inch baking pan.
- Bake for 25 to 30 minutes or until edges are lightly browned. Sprinkle with remaining morsels. Let stand for 5 minutes or until morsels are shiny; spread evenly. Cool completely in pan on wire rack. Cut into bars.
Hope you Enjoy,
FruitStripeApe
Monday, December 13, 2010
Easy Tuna Salad Lunch. Easy Pork Tenderloin w/ Sweet Potato Dinner
This is what was I made today being snowed in and all here in NE Ohio.
Easy Tuna Salad Lunch
12oz family size Tuna pouch
2 stalks of Celery (cut in half long ways and cut into little cubes)
2 medium size Dill Pickles (cut into little cubes)
Salt + Pepper (to taste)
6T Mayo (more or less depending on how moist you want it)
Mix all ingredients together until incorporated
Chill in fridge or eat right away
I ate my old school subway style and cut the top of a small Ciabatta around the top edges and took some of the bread out of the inside and filled with Tuna Salad topped with mixed green, vinegar and the top of the bread.
Easy Pork Tenderloin w/ Sweet Potato Dinner
1lb Pork Tenderloin
salt + pepper
1T oil
6 medium Sweet Potatoes(Yams are great too)
Pressure cooker with Steaming basket
Preheat the oven to 400F
Brown pork well in a preheat oven safe pan
Once browned Season with Salt + Pepper
Put into the oven and cook for 20 minutes
Then take out and let rest in pan for 10 minutes
At the same time pressure steam the Sweet Potatoes for 20 minutes
Thin slice the Pork and serve over greens with a fresh made vinaigrette, put the sweet potatoes on the side and top with a big spoonful of sour cream.
Hope you Enjoy,
FruitStripeApe
Sunday, December 12, 2010
Pressure Cooked Salisbury Steak
I had this awesome creation for dinner. So I thought i would share it with you!!!
Pressure Cooked Salisbury Steak
4 6oz Ground beef patties (Ground turkey, chicken, veal or lamb can be used too)
1.5 lbs Potatoes (Peeled and cut into quarters)
1lbs baby carrots
3 celery stalks (cut into 1 inch pieces)
2 cups Beef Broth
1T cornstarch + 1T cold water (mixed)
Salt and Pepper (for seasoning at the very end)
Sear Beef Patties and put to the side
Layer potatoes, carrots and celery
Add broth
Put seared beef patties on top
Secure lid
Turn heat to high until pressure is achieved
Lower heat and maintain pressure
After 10 minutes Depressurize
Drain liquid into a small sauce pan
Add cornstarch mixture
stir and heat til boiling
Then stir until thickened
Serve with vegetables on the bottom, the patty on top with salt, pepper and some sour cream on the side.
Hope you enjoy!
FruitStripeApe
Subscribe to:
Posts (Atom)