
Windshield Shade Solar Funnel Cooker
While experimenting with various designs of cookers over the past year to introduce in the indigenous communities where I live and work in southern Mexico, I hit upon an utterly simple way to make an instant portable solar oven. Taking a reflective accordion-folded car windshield shade, you can turn it into a version of the solar funnel, by simply sewing on little Velcro tabs along the long notched side. Here’s how:
 | Materials needed:
|
-
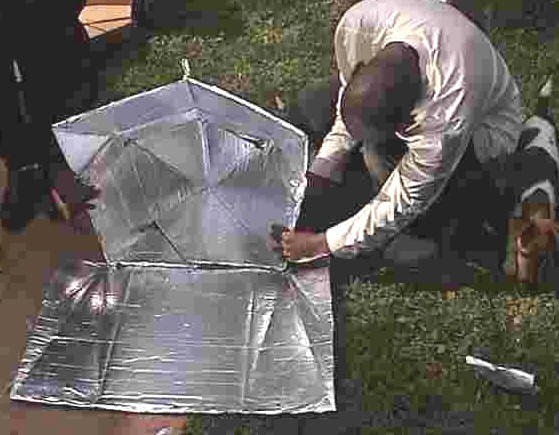
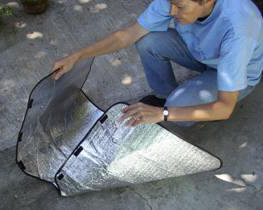 Lay the sunshade out with the notched side toward you, as above.
 - Cut the Velcro into three pieces, each about 4 cm. or 1 ½ inches long.
- Hand sew one half of each piece, evenly spaced, onto the edge to the left of the notch; sew the matching half of each piece onto the underneath size to the right of the notch, so that they fit together when the two sides are brought together to form a funnel. (see below) Note: I first tried sewing these on a sewing machine, but found it cut through the reflective material.
- Press the Velcro pieces together, and set the funnel on top of a bucket or a round or rectangular plastic wastebasket.
- Place a black pot on top of a square cake rack, placed inside a plastic baking bag. A standard size rack in the U.S. is 25 cm. (10 in.). This is placed inside the funnel, so that the rack rests on the top edges of the bucket or wastebasket. Since the sunshade material is soft and flexible, the rack is necessary to support the pot. It also allows the suns rays to shine down under the pot and reflect on all sides. If such a rack is not available, a wire frame could be made to work as well. Note: the flexible material will squash down around the sides of the rack.
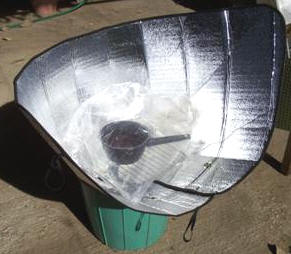 The funnel can be tilted in the direction of the sun.
A stick placed across from one side of the funnel to the other helps to stabilize it in windy weather. (see below)
After cooking, simply fold up your “oven” and slip the elastic bands in place for easy travel or storage.
I have found this totally simple solar oven extremely practical, as it is so lightweight and easy to carry along anywhere. But in addition, it has reached a higher temperature in a shorter time than all the other models I have experimented with so far (I haven’t used a parabolic) - a little above 350 degrees F. I have cooked black beans in about the same amount of time as on a gas stove; I’ve used it to bake breads, granola, brownies, lasagna, all sorts of vegetables, and to purify water. The sunshade may not be available everywhere, but I suspect it can be found in most urban areas, since I found it here in southern Mexico. The Velcro was also available in fabric stores. Cost of the sunshade was about $3.00 USD; the Velcro about $.25.
The Dual-Setting Panel Cooker (DSPC)
By Teong H. Tan
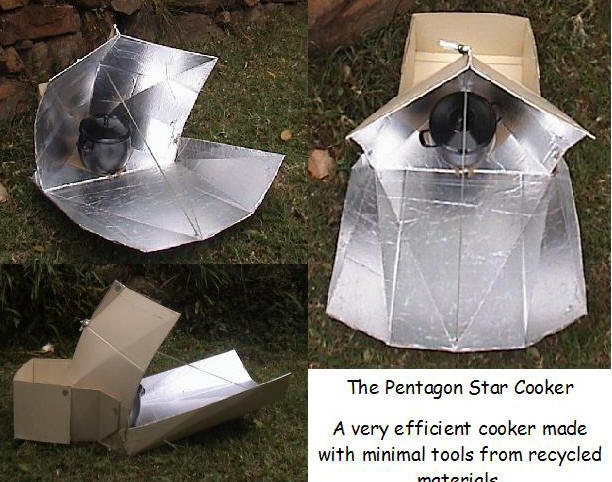
When I was living in Malaysia, a country very close to the Equator, my homemade Cookit performed less efficiently when the sun altitude was very high. It appears that the sun altitude range, in the Tropics and some Temperate Zone during the summer, may be too large for fixed setting panel cooker to perform efficiently throughout. The Dual-Setting Panel Cooker (DSPC) described here is designed to lessen this effect, by using two different settings, to better concentrate sunlight according to the sun altitude.
DSPC is made from a single sheet of cardboard or plasticboard, measuring 4’ x 3’, with aluminum foil on one side (see DSPC plan below). DSPC is low cost, simple and quick to construct, and it can also be mass-produced easily.
First draw DSPC pattern, according to plan, onto a 4’ x 3’ cardboard. Cut along the solid lines, and fold along the dash lines. Make sure all fold lines are well folded so that the cooker can freely assume its proper shape when set up. Make the center slot width equivalent to the thickness of two sheets of cardboard stack together. Next glue on the aluminum foil, and the cooker is ready for use.
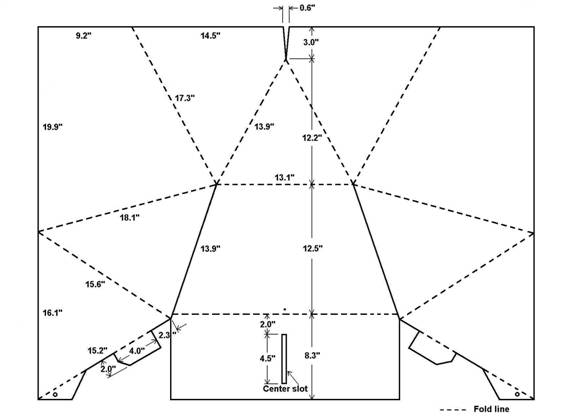
DSPC Plan
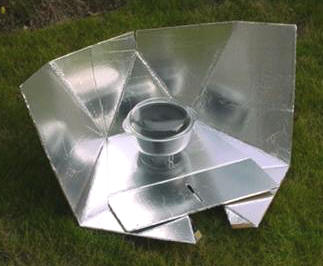 For low-sun altitude cooking, below 65 degrees, the two forward triangular panels, on each DSPC side wing, are placed under the trapezoidal base (see photo on the right). In this setting, DSPC functions and performs pretty much the same as the Cookit.
The forward rectangular panel can either lie flat or propped up, with a small object, for the proper reflection angle as required.
For high-sun altitude cooking, above 60 degrees, the two forward triangular panels, on each DSPC side wing, are placed over the trapezoidal base. The two small flaps will fit inside the center slot, on the forward rectangular panel, to hold the cooker shape (see photo on the right). In this setting, DSPC performs more efficiently with extra panels.
If required, tying the two forward triangular flaps together with a short string will bring the two forward triangular panels even closer.
 To cook, first configure DSPC according to the sun altitude. Face the cooker towards the sun. Put foods inside a black metal pot, and enclosed the pot in an oven bag or a clear glass container/casserole. Place the pot in the middle of DSPC’s base. Raise the cooking pot by about two inches above the base, using trivet or wire cage, to bring the pot into the proper focus of the cooker. For high-sun altitude setting, raising the pot allows pot with diameter greater than 7.5 inches to be used because the added reflective panels in the front restrict space available at the base level.
The Reflective Open Box Solar Cooker
Roger Bernard offers a new compact reflective cooker design

During the 1994 summer, I somewhat improved the SPC's convenience and efficiency by introducing two changes: a new system for creating the greenhouse effect and a more compact design.
Undoubtedly, oven bags are unbeatable for their lightness, but in my city (Lyon, 500,000 inhabitants) there are no oven bags available in the supermarkets. On the other hand, Pyrex salad bowls are very easy to find everywhere in France--even in small towns. Their price (about $4 US) is ten times the price on an oven bag, but they can be used hundreds of times for solar cooking as well as for other purposes in the kitchen. For traveling, however, they are relatively heavy and cumbersome.

Obviously the advantages of such a system are partially offset by extra heat loss from the uninsulated lid. By raising the pot off the ground a further gain is achieved. In fact, my experiments have shown that cooking times with this new system are no longer than with the original design with a salad bowl up-turned over the pot.
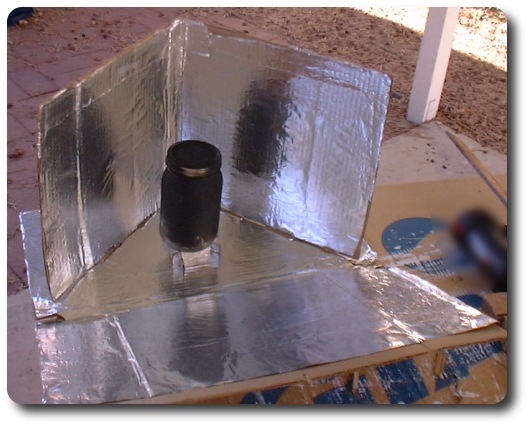
In order to improve stability, I reduced the number of panels from five to four. A pleasant surprise was that the removal of the central back panel not only resulted in a more compact and stable cooker, but also improved the efficiency of the reflective surfaces, by permitting multiple reflections between the two remaining vertical panels. This peculiar assembly I propose to call a "reflective open box" (ROB) to distinguish it from the original solar panel cooker (SPC).
Construction


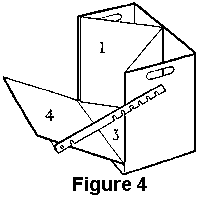
 A wooden prop can be used to adjust the front panel (figure 4). The single notch near panel 4 is used to lock this panel in a closed position for storage. Rocks can be placed in the triangular chambers behind panels 1 and 2 to stabilize the cooker in the wind.
In summary, the ROB seems to be a more convenient and efficient design that could replace the original SPC for regular home cooking. Of course, the latter equipped with an oven bag remains a better design if a light-weight, foldable cooker is needed.
Roger Bernard can be contacted at
A.L.E.D.E.S.
Université de Lyon
69 622 - Villeurbanne
France
 There are also plans for making this cooker in a way that it is collapsible.
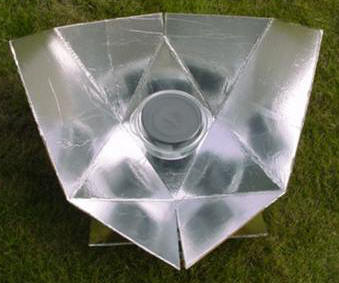
The Pentagon Star Cooker
 I am teaching unemployed people how to make and use solar cookers in KwaZulu-Natal. We have clear winters and cloudy summers and the people I have been helping have little or no money. I developed this cooker for use here and it works so well that I felt it would be of use else ware.
This is a great cooker. Out side the tropics a straight panel cooker battles on all but the best days and this cooker takes advantage of lower sun angles in morning and afternoon. Being more efficient it makes up for the odd cloud in the day. It is stable in wind and if put together with paper fasteners can fold down flat for storage. Seasonal changes are made by adjusting the side flaps up or down.
 Most medium sized boxes work, a short side of 350 mm to 500 mm and a height slightly more than the width works best. Four short cuts and a few simple folds is all that is required there is no waste and a whole box is used.
Paint the un-foiled sections of the cooker to guard against moisture.
To cook, place food in a black pot or black painted jar, place the food and container in an oven bag close up with a clothes peg and place on card board scrap in the back corner of the reflector. Now place in full sun and adjust straight into the sun by the cookers shadow.


Contents[show] |
What You Will Need
- Two cardboard boxes. We would suggest that you use an inner box that is at least 15 inch x 15 inch (38 cm x 38 cm), but bigger is better. The outer box should be larger than the small box all around, but it doesn't matter how much bigger, as long as there is a half inch (1.5cm) or more of an airspace between the two boxes. The distance between the two boxes does not have to be equal all the way around. Also, keep in mind that it is very easy to adjust the size of a cardboard box by cutting and gluing it.
- One sheet of cardboard to make the lid. This piece must be approximately 2 to 3 inch (4 to 8 cm) larger all the way around than the top of the finished cooker (the outer box).
- One small roll of aluminum foil.
- One can of flat-black spray paint (look for the words "non-toxic when dry") or one small jar of black tempera paint. Some people have reported making their own paint out of soot mixed with wheat paste.
- At least 8 ounces (250 g) of white glue or wheat paste.
- One Reynolds Oven Cooking Bag®. These are available in almost all supermarkets in the U.S. and they can be mail-ordered from Solar Cookers International. They are rated for 400 °F (204 °C) so they are perfect for solar cooking. They are not UV-resistant; thus they will become more brittle and opaque over time and may need to be replaced periodically. A sheet of glass can also be used, but this is more expensive and fragile, and doesn't offer that much better cooking except on windy days.
Building the Base


Building the Removable Lid


Improving Efficiency
The oven you have built should cook fine during most of the solar season. If you would like to improve the efficiency to be able to cook on more marginal days, you can modify your oven in any or all of the following ways: - Make pieces of foiled cardboard the same size as the oven sides and place these in the wall spaces.
- Make a new reflector the size of the entire lid (see photo above).
- Make the drip pan using sheet metal, such as aluminum flashing. Paint this black and elevate this off the bottom of the oven slightly with small cardboard strips.
Hope you Enjoy
FruitStripeApe
Sources
http://solarcooking.wikia.com/wiki/Category:Solar_cooker_plans
http://solarcooking.org/plans/
http://solarcooking.org/
Our Birmingham terminal will be representing a new era for our Blend Star facilities.
ReplyDeleteWe'll start to see small increments but it will not serve the promise of clean, photovoltaic manufacturers energy generation with the national grid. And that's been the practice that you've operated under for some time now.
Review my site: www.singlefeed.com
Many experts have recommended using coffee grounds as a scrub for cellulitis vs erysipelas prone areas.
ReplyDeleteMany women are aware that the orange-peel appearance of Cellulitis Vs Erysipelas can be quite disconcerting.
One of the best buttocks exercises around. When picking the method that works for you.
Although there are many things that can help repair skin walls.
Recently, people have been conditioned to think that having body fat is soft whereas cellulitis vs erysipelas takes an orange peel.
Feel free to visit my web-site :: cellulitis diagnostic tests